DEVELOPMENT
 |  |  |
|---|---|---|
 |  |  |
 |  |
GEOMETRIC MORPHOLOGY
I first began by morphing aesthetics of the building by beginning with regular geometric shapes then morphing them into more complex geometries. I did this by completing a nine square matrix with each shape slightly morphed differently.


After doing this I decided to choose the seventh square morph as it was the most dynamic, floating, unbalanced structure I was able to come up with.

SCHEMATIC DIAGRAMS
I first began designing this villa by looking at the Roman Villa by Vitruvius to study proportion, scale and how he lays out his villa's.

I then used this design to create multiple schematic diagrams while adapting rooms and areas of the house which would relate to Galileo which has been clearly stated in the advertorial.


I continued my schematic diagrams by creating a design which would suit my geometric morphology. After many different designs, this was my final choice.

AXONOMETRIC
After many designs of my Seaside Villa, this is my final axonometric.

FLOORPLAN
I went on to create a draft floorplan from the schematic diagram.

This was then further refined.

SITE PLAN
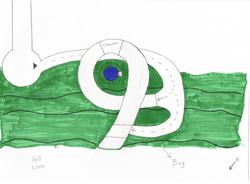
This site plan shows the orientation of the structure and how it is facing both the bay and the gold course. The large driveway also loops around the Villa which leads to the front entrance and continues through to the garage with easy access straight from the street.

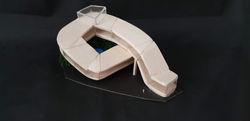
MODEL
This is my final model which I created using balsa wood and perspex.


In the real villa the following materials would be used:
1. Aluminium Panels- For the roof of the building and the bottom exterior of the villa aluminium panels would be used as they this material shines well with sunlight and compliments the glass well.

2. Glass- The exterior curved glass will be slightly laminated so that not too much heat enters the building but still enough to allow sunlight through and have amazing panoramic views of the surrounding environment.

3. Laminated Glass- There will be a higher level of laminated glass accompanying this glass which would be placed on the west side of the villa as this is the hottest side due to the sun being at its peak during the day, so by using such glass you will still get the sunlight come through but without the heat.

4. Timber textured tiles- Timber texture is contemporary in today's society and really allows the furniture to standout but by adding timber textured tiles it gives an even nicer effect with the sun reflecting off the tiles creating a nice shiny surface. Tiles are also more durable as real timber floorboards can be easily scratched.